![]() On-line Help
On-line Help
<< 2.3 Saving & Printing >>
This section shows you how to save and print the images that you colour in BlackMagic.You must have successfully completed the steps in the previous sections to be able to carry on from here.
In the previous section, you completed colourizing the Beach & Fortress black & white photos. The Next step is to save a copy of this colourized version to a disk file, and optionally to make a colour print of your photo.
Saving is quite easy; simply click on the "SaveAs" button on the "Operations" bar (top panel on the main screen). This will bring up a standard Windows File Save dialog. Select the folder into which you want to save the file (ensure that there is plenty of free space available as the image is stored as 24-bitmap, and can take a lot of space depending upon the size). Now enter the name that you want to save the file as, in the filename edit box, then click on the "Save" button. That's it; If you do not want to print at this time, you may open this saved colour version later and print at that time.
To print the colour image, you should have a good quality colour printer capable of photographic quality output, and ensure that it is properly connected to your computer. Printers normally come with their unique "driver" software, that interpret the colour information from an image (such as BlackMagic image), and render it on to the photo paper in the most optimal way. Please refer to your printer manual for more details on items like "setting your printer to print in colour photographic quality", "what type of special paper may be required", etc.
When you Click on the "Print" button on the Operations bar (top panel on the main BlackMagic screen), it brings up a dialog box like this:
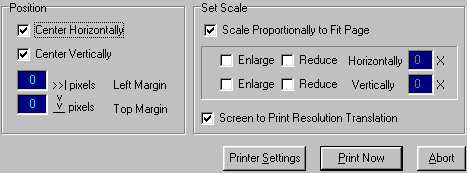
Each of the options is explained in detail in the Operations, Tools & Palettes Reference section. To print with the minimum of fuss, please follow the following steps:
1. Ensure that the printer is turned on, ready, and loaded with the correct type of paper.
2. Click on the "Printer Settings" button; what happens next depends upon your specific printer driver software. Most of these will however let you define the paper size, orientation (landscape/ portrait), number of copies to print, print/ paper quality, etc. Make appropriate selections. Generally speaking, you should choose the settings that allow you to print the most superior quality colour output. Close the Printer settings dialog, and you are back to the above dialog.
3. Check the "Center Horizontally" & the "Center Vertically" check-boxes.
4. Check the "Scale Proportionally to Fit Page" check-box.
5. Now if you want to go ahead and print, click on the "Print Now" button; else Click on the "Abort" button to return to BlackMagic without printing.
www.NEURALTEK™.com
NeuralTek, BlackMagic, TimeBrush, TimeBrush RLC/ Real Life Colour are registered/ unregistered trademarks/ names of NeuralTek and TimeBrush Pty. Ltd. [ACN 064 583 633].
All other trademarks/ names are the property of their respective owners.
Content Copyright NeuralTek, and subject to change without notice - All Rights Reserved.