![]() On-line Help
On-line Help
<< 2.2 Simple Colouring Operations >>
This section gets you started colouring your first photo in BlackMagic.You must have successfully completed the steps in the previous section to be able to carry on from here.
In the previous section, you concluded by getting a source black & white image into BlackMagic, either from the disk, or from a scanner; either way, if you managed to do this successfully, you would now see the caption on the first button on the top panel changed to "Clear Image"; click this button to close the image window.
To get started colourizing your first photo, follow the steps to load an image from the "samples" directory located in the folder where you installed BlackMagic; the image is called "beach.jpg" (or beach.bmp). Depending upon the version of your BlackMagic software, you would see a screen similar to the following.
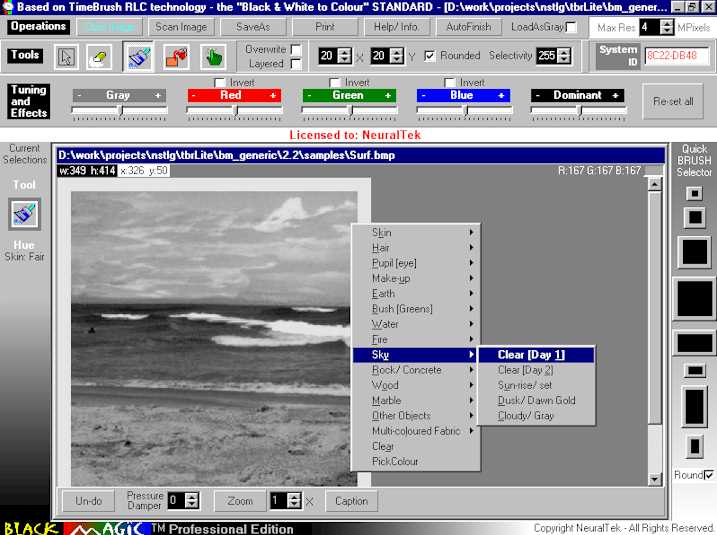
If you do not see a pop-up menu over the image, place the mouse cursor anywhere on the image and CLICK on the right mouse button to display a menu similar to that shown over the image above.
In BlackMagic, you do not normally pick individual colours to paint (though you can), as you would need to in some other painting software packages - instead, you simply choose the type of object that you desire to paint from the pop-up menu; BlackMagic dynamically and automatically tunes the colour variations, depending upon the image area you want to paint, and the object type that you select.
Now Scroll down in the pop-up
menu to select "Sky" then select "Clear [Day 1]"
from the sub-menu; the menu will disappear. You have just told BlackMagic what type of
object you wish to paint; now you have got to tell it where that object is on the image.
To do this, you first select a tool from the "Tools" bar
(second panel on main screen from the top). For our current purpose, we will select the
"Select Paint" tool (![]() ) Do this by clicking on the corresponding button.
Also make sure that the "Check-box" next to "Overwrite" label is
checked, and the one next to "Layered" is not checked. Your tool-bar should now
appear similar to the one shown below.
) Do this by clicking on the corresponding button.
Also make sure that the "Check-box" next to "Overwrite" label is
checked, and the one next to "Layered" is not checked. Your tool-bar should now
appear similar to the one shown below.
Now move the mouse cursor back on to the image then drag to draw a rectangle that closely fits around the "sky portion" of the image, as shown below-right (you drag by holding down the left mouse button, while moving the mouse around; as you do this, a rectangle appears to grow/ shrink along with the mouse movement, just as a rubber-band would). Let go of the left mouse button, when the rectangle is just the right size (see image below).

Soon as you let go of the left mouse button (stop dragging), BlackMagic will start applying the colour scheme that you have chosen, to the area you selected. Repeat this process to:
pick the object type "Water" from the pop-up menu, then select "Ocean Blue", then drag as you did before to select the portion of the image representing the water body;
then again, pick the object type "Earth" from the pop-up menu, select "Light" from the sub-menu, then drag to select the rectangular region representing the 'beach area.
If you make a mistake at any step (such as over/ under select an area), just click on the "Un-do" button at the bottom of the image window to return to the previous state (you may need to 'Enable' "un-do" by clicking on the check-box next to the button, so that it appears "checked").
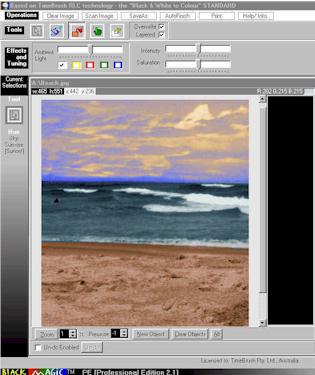
Once you have followed the above three steps correctly, you should have an image that looks like:

Now this is far from perfect, but not bad for
a few seconds and 'mouse-clicks' worth of effort. Actually, we will continue to refine
this image to a much better quality. To begin with, notice the edge towards the right of
the image, where the ocean ends and the beach begin; the end part of the surf falling on
to the beach takes on the colour of the beach too abruptly (![]() ). Let us smooth this out first with the "Smart
Brush" tool. select it by clicking on the (
). Let us smooth this out first with the "Smart
Brush" tool. select it by clicking on the (![]() ) button on the "Tools" panel. At
its worst, this tool works like a regular 'paint brush' tool (as in other paint programs);
but it can work much smarter, taking care not smear colour on unwanted surrounding areas
(refer to the Reference section for more details).
) button on the "Tools" panel. At
its worst, this tool works like a regular 'paint brush' tool (as in other paint programs);
but it can work much smarter, taking care not smear colour on unwanted surrounding areas
(refer to the Reference section for more details).
For our present requirement, the default
behavior will suffice. Now pick the Water -> Ocean Blue colour scheme
from the popup menu, as you did while colouring the Ocean. Because we want to 'layer' the
subsequent painting on top of the existing rendering, make sure that the
"Layered" check-box is in the "Checked" state (refer the
"Tool" panel image above). Now, move the cursor on the image area representing
the ocean, and begin dragging (move mouse while left button is depressed). The cursor will
change to a round brush shape, and the 'Ocean Blue' colour scheme will be Layered
on top of other colour schemes that the brush encounters (Light Earth in our
case). Slowly continue this 'dragging' behavior, moving the brush in side-to-side strokes,
while moving down towards the beach area with each stroke, until the colours at the edge
of water and beach merge with one-another in a smooth gradation. Once you achieve this,
the relevant portion of the image should look like 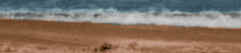 (compare to the above insert). This is the
right look, and should take just a couple of side-to-side movements of the brush as
described above.
(compare to the above insert). This is the
right look, and should take just a couple of side-to-side movements of the brush as
described above.
Now we will try and brighten-up the sky a little bit. How about a "sunset" look? Select the "Select Paint" tool as you did above, then pick the Sky -> Sunrise/ set colour scheme from the popup menu. Now, click on the "Overwrite" and "Layered" checkboxes on the "Tools" menu, so that these are both in the "checked" state (Checking the "Overwrite" box gives permission to the "Select Paint" tool to modify any colour schemes it encounters; Checking the "Layered" box tells it to modify through "Layering" on top of existing colour schemes rather than "Overwriting" these). Finally, locate the "Pressure" control below the image (in the image window), and change its value to "-1"; this tells the tool to modify the default pressure with which it applies colours, and use a 'softer' touch.
With these settings in place, colour the sky
as you did before, by dragging and drawing a rectangular region around the sky; the sky
colour should now look as 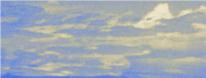 .
You can layer any colour scheme, on top of any other, any number of times, and with
varying degrees of pressure, to get a variety of effects. For example, keeping the
settings exactly as before, if you repeat the sky colouring operation as above, you should
now have an image that looks like the one below:
.
You can layer any colour scheme, on top of any other, any number of times, and with
varying degrees of pressure, to get a variety of effects. For example, keeping the
settings exactly as before, if you repeat the sky colouring operation as above, you should
now have an image that looks like the one below:
As colour preferences are subjective, experiment till you get the look that's just right for you; as long as you remember the simple rules described above, you can't go wrong in BlackMagic. Colouring the image as above, from start to finish, should take only a couple of minutes.
More advanced colourizing techniques are discussed in later sections, and the Operations, Tools & Palettes Reference section provides a full and exhaustive discussion of all BlackMagic capabilities.
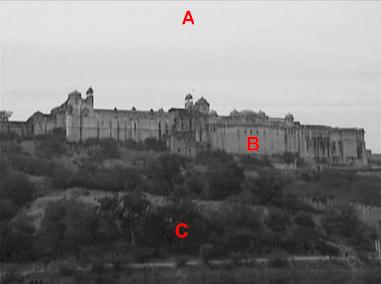
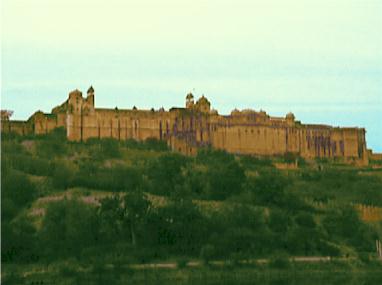
Let us now colour another sample image that will demonstrate the use of the "Magic-touch Paint" tool; clear the above image, then load "Fortress.jpg" (or Fortress.bmp) from the samples directory, as you did the above image. This is what the image looks like (without the markings, scaled down) when you begin (below-left), and when you have colourized it (below right). Total effort: under 2 minutes, and a few mouse operations.
Let us begin.
First, select the "Magic
Touch-paint" tool from the "Tools" bar by clicking on the (![]() ) button; then, make
sure that the "Overwrite" and "Layered" options (to the right) for
this tool are both checked.
) button; then, make
sure that the "Overwrite" and "Layered" options (to the right) for
this tool are both checked.
Now pick the object type from the popup menu by right clicking on the image, then selecting "Sky -> Clear [Day 1]".
Click just once (left mouse button) on the top part of the image (lightest part of the sky), approximately where the reference point "A" is shown (above-left), then wait until the progress dialog disappears. You will see the sky turn a slight shade of blue, though not enough. To make it the right blue shade, click in the same area again, and then again after the progress dialog disappears (retaining the original colour/ tool settings); essentially, you are layering the sky blue colours on top of each other; each time you repeat this, the colours become a touch brighter.
Now pick the "Earth -> Light" colour scheme, then click once on the 'lightest' part of the fortress (approximately in the area marked "B") - wait until the progress dialog disappears.
Now pick the "Bush [Greens] -> Summer" colour category from the popup menu, then click once on the darkest part of the image (towards the bottom, approximately in the area marked "C").
To finish-up, change the value in the
"Pressure" edit box in the Image Window down to a value of "-2" (to
layer with a soft-touch); pick the colour category "Earth -> Dark" from the
popup menu by right clicking on the image; then change the tool to "Smart
Paint-brush" by clicking on the (![]() ) button. Now carefully drag the brush (move
while holding down the left mouse button) across the fortress (remember, the
"Layered" checkbox should be in 'checked' state). This will make the fortress a
darker shade as shown in the finished picture above.
) button. Now carefully drag the brush (move
while holding down the left mouse button) across the fortress (remember, the
"Layered" checkbox should be in 'checked' state). This will make the fortress a
darker shade as shown in the finished picture above.
Thats it. At any time if you do something
wrong, you can also restore parts of the image to their original state by using
"Un-do" button, or the combination of the "Smart Paint-brush" tool and
the Eraser (![]() ). If you like,
you can layer different shades of green on to the bush areas selectively, and may be layer
a shade of 'red' on to the sky - experiment to get the look that's just right for you. The
purpose of this tutorial is only to familiarize you with the basic BlackMagic operations.
). If you like,
you can layer different shades of green on to the bush areas selectively, and may be layer
a shade of 'red' on to the sky - experiment to get the look that's just right for you. The
purpose of this tutorial is only to familiarize you with the basic BlackMagic operations.
If you are feeling confident now, you can try colourizing some of your own images; otherwise, click on the <Next Topic> link to learn a bit more.
www.NEURALTEK™.com
NeuralTek, BlackMagic, TimeBrush, TimeBrush RLC/ Real Life Colour are registered/ unregistered trademarks/ names of NeuralTek and TimeBrush Pty. Ltd. [ACN 064 583 633].
All other trademarks/ names are the property of their respective owners.
Content Copyright NeuralTek, and subject to change without notice - All Rights Reserved.